实现指令 (v-bind)
方针
从这里开始,我们将实现 Vue.js 的精髓——指令系统。
和往常一样,指令也需要经过 transformer 处理,这里会用到 DirectiveTransform 这个接口。 DirectiveTransform 接收 DirectiveNode 和 ElementNode,返回转换后的 Property。
export type DirectiveTransform = (
  dir: DirectiveNode,
  node: ElementNode,
  context: TransformContext,
) => DirectiveTransformResult

export interface DirectiveTransformResult {
  props: Property[]
}
首先,让我们确认一下本次要实现的开发者接口。
import { createApp, defineComponent } from 'chibivue'

const App = defineComponent({
  setup() {
    const bind = { id: 'some-id', class: 'some-class', style: 'color: red' }
    return { count: 1, bind }
  },

  template: `<div>
  <p v-bind:id="count"> v-bind:id="count" </p>
  <p :id="count * 2"> :id="count * 2" </p>

  <p v-bind:["style"]="bind.style"> v-bind:["style"]="bind.style" </p>
  <p :["style"]="bind.style"> :["style"]="bind.style" </p>

  <p v-bind="bind"> v-bind="bind" </p>

  <p :style="{ 'font-weight': 'bold' }"> :style="{ font-weight: 'bold' }" </p>
  <p :style="'font-weight: bold;'"> :style="'font-weight: bold;'" </p>

  <p :class="'my-class my-class2'"> :class="'my-class my-class2'" </p>
  <p :class="['my-class']"> :class="['my-class']" </p>
  <p :class="{ 'my-class': true }"> :class="{ 'my-class': true }" </p>
  <p :class="{ 'my-class': false }"> :class="{ 'my-class': false }" </p>
</div>`,
})

const app = createApp(App)

app.mount('#app')
v-bind 有上面这些基本用法。更详细的内容,请参考官方文档。
本次我们也将处理 class 和 style 的特殊绑定。
https://vuejs.org/api/built-in-directives.html#v-bind
AST 的修改
首先,对于 AST,目前 exp 和 arg 都是简单的 string 类型,我们需要修改它们以接收 ExpressionNode。
export interface DirectiveNode extends Node {
  type: NodeTypes.DIRECTIVE
  name: string
  exp: ExpressionNode | undefined // 这里
  arg: ExpressionNode | undefined // 这里
}
再次解释一下 name、arg 和 exp: name 是指令名称,如 v-bind 或 v-on 中的 bind 或 on。 这次我们要实现 v-bind,所以这里会是 bind。
arg 是用 : 指定的参数。对于 v-bind 来说,这里会是 id 或 style 等。
(对于 v-on 来说,这里会是 click 或 input 等。)
exp 是右侧的表达式。对于 v-bind:id="count",这里会是 count。
由于 exp 和 arg 都可以动态地嵌入变量,所以它们的类型是 ExpressionNode。
(因为 arg 也可以是动态的,如 v-bind:[key]="count")

Parser 的修改
我们需要修改 parser 的实现来适应 AST 的这些变更。将 exp 和 arg 解析为 SimpleExpressionNode。
顺便也解析 v-on 使用的 @ 和插槽使用的 # 等。
(因为编写正则表达式比较麻烦,所以我们暂时直接借用官方的实现)
参考:https://github.com/vuejs/core/blob/623ba514ec0f5adc897db90c0f986b1b6905e014/packages/compiler-core/src/parse.ts#L802
下面的代码有点长,我会在代码中添加注释来解释。
function parseAttribute(
  context: ParserContext,
  nameSet: Set<string>,
): AttributeNode | DirectiveNode {
  // .
  // .
  // .
  // .
  // directive
  const loc = getSelection(context, start)
  // 这里的正则表达式是从官方借用的
  if (/^(v-[A-Za-z0-9-]|:|\.|@|#)/.test(name)) {
    const match =
      // 这里的正则表达式是从官方借用的
      /(?:^v-([a-z0-9-]+))?(?:(?::|^\.|^@|^#)(\[[^\]]+\]|[^\.]+))?(.+)?$/i.exec(
        name,
      )!

    // 检查 name 部分的匹配,如果以 `:` 开头,则视为 bind
    let dirName =
      match[1] ||
      (startsWith(name, ':') ? 'bind' : startsWith(name, '@') ? 'on' : '')

    let arg: ExpressionNode | undefined

    if (match[2]) {
      const startOffset = name.lastIndexOf(match[2])
      const loc = getSelection(
        context,
        getNewPosition(context, start, startOffset),
        getNewPosition(context, start, startOffset + match[2].length),
      )

      let content = match[2]
      let isStatic = true

      // 如果是动态参数,如 `[arg]`,则将 `isStatic` 设为 false,并提取内容
      if (content.startsWith('[')) {
        isStatic = false
        if (!content.endsWith(']')) {
          console.error(`Invalid dynamic argument expression: ${content}`)
          content = content.slice(1)
        } else {
          content = content.slice(1, content.length - 1)
        }
      }

      arg = {
        type: NodeTypes.SIMPLE_EXPRESSION,
        content,
        isStatic,
        loc,
      }
    }

    return {
      type: NodeTypes.DIRECTIVE,
      name: dirName,
      exp: value && {
        type: NodeTypes.SIMPLE_EXPRESSION,
        content: value.content,
        isStatic: false,
        loc: value.loc,
      },
      loc,
      arg,
    }
  }
}
现在我们可以将模板解析为我们需要的 AST 节点了。
Transformer 的实现
接下来,我们将实现将这个 AST 转换为 Codegen 用的 AST 的功能。
这个过程比较复杂,所以我在下图中简单总结了流程。请先看一下这张图。
大致需要考虑的要点有:v-bind 是否有参数、是否是 class、是否是 style 等。
※ 图中省略了与本次实现无关的部分。(这不是一个非常严格的图表,请谅解。)
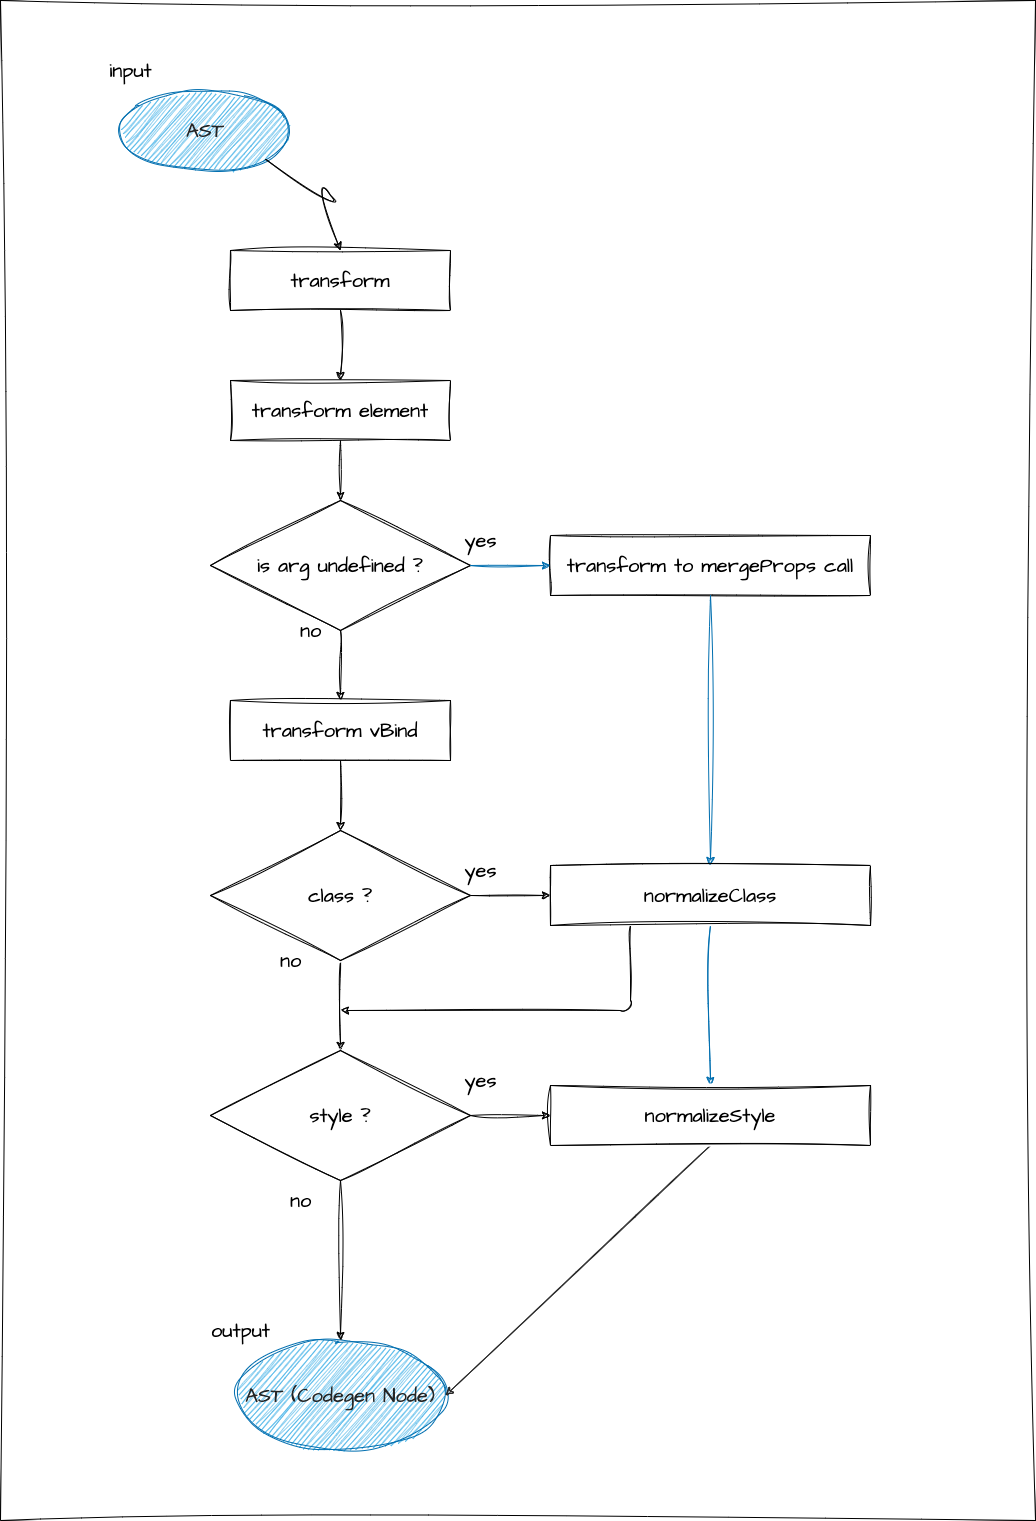
首先,指令基本上是声明在元素(element)上的,所以与指令相关的 transformer 会在 transformElement 中被调用。
这次我们要实现 v-bind,所以会实现一个名为 transformVBind 的函数,
需要注意的是,这个函数只处理有 args 的声明。
transformVBind 的作用是将:
v-bind:id="count"这样的表达式转换为:
{
  id: count
}
这样的对象(实际上是表示这个对象的 Codegen Node)。
在官方实现中也有类似的说明:
codegen for the entire props object. This transform here is only for v-bind with args.
从流程图中可以看出,transformElement 会检查指令的 arg,如果不存在,就不执行 transformVBind,而是转换为 mergeProps 函数调用。
这是用于合并 v-bind="hoge" 形式传递的参数和其他 props 的函数。
<p v-bind="bindingObject" class="my-class">hello</p>↓
h('p', mergeProps(bindingObject, { class: 'my-class' }), 'hello')另外,关于 class 和 style,它们有各种开发者接口,需要进行标准化。
https://vuejs.org/api/built-in-directives.html#v-bind
我们将实现 normalizeClass 和 normalizeStyle 这两个函数,并分别应用。
如果 arg 是动态的,无法确定具体是什么,就会实现并调用 normalizeProps 函数。(内部会调用 normalizeClass 和 normalizeStyle)
完成这些实现后,让我们看看效果!
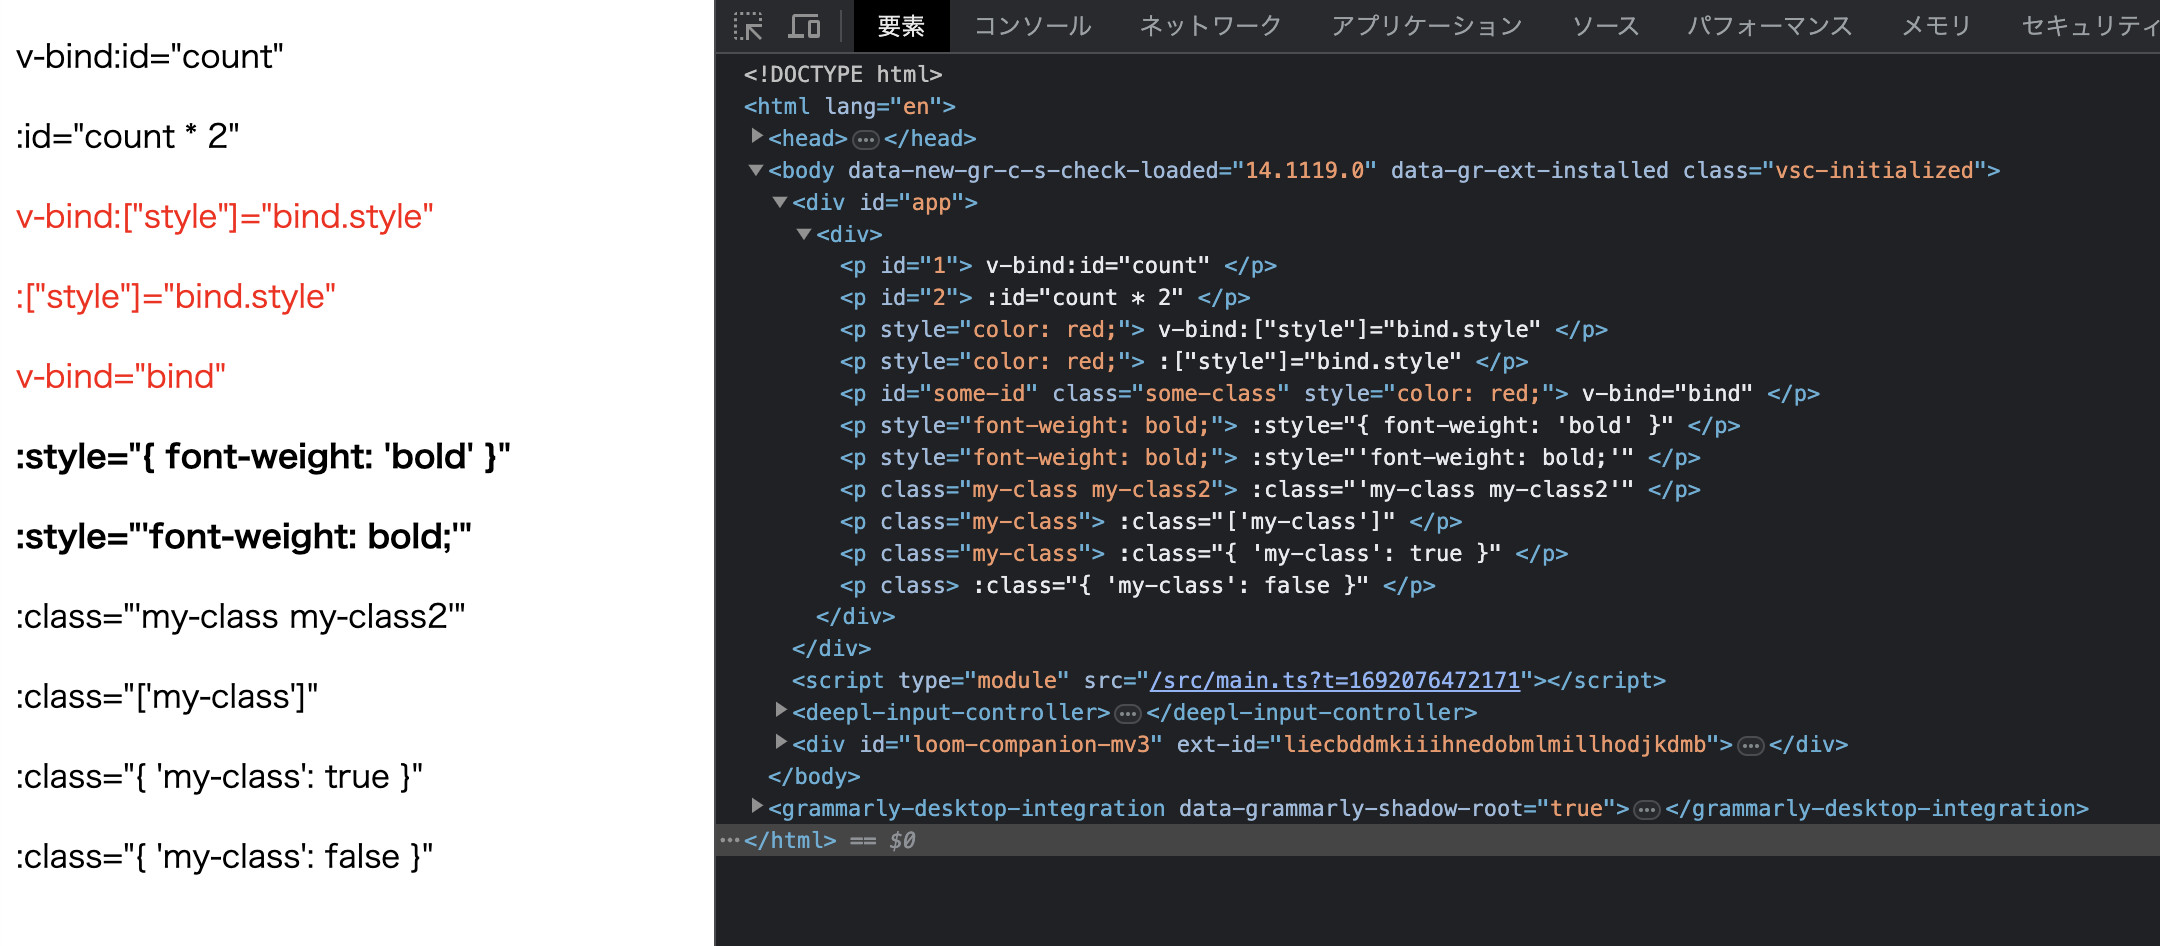
看起来非常不错!
下一次我们将实现 v-on。
到此为止的源代码:
GitHub